 | ||||
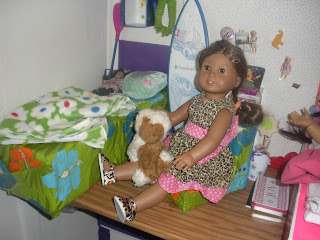
| Our Kanani and Barksee trying the chair out in their room. |
A Chair for Kanani:
Items Needed:
-Boxes: one square and one rectangle that is slightly larger than the square.
-Kanani inspired fabric or table cloth. ( I used a tablecloth.)
-Duck Tape
-Scissors
-Hot glue
-thumb tacks
Getting to Work:
Step 1: Stuff the boxes with newspaper and tape flaps shut. Then, line the rectangle box up to the back of the square box and hot glue the ends together. This forms the basic chair structure.
Step 2: Cut a large square of fabric or tablecloth to use to cover the chair. I placed my tablecloth over the chair and estimated how much to cut to cover the chair. I don't usually measure things. I just use my best judgment.
 Step 3: Hot glue the tablecloth/fabric to the bottom front edge of the chair.
 Step 4: Continue to hot glue the tablecloth/fabric to the front of the chair making sure to push the tablecloth/fabric flat and smooth.
Step 5: Cut the tablecloth/fabric at the bend of the chair to make covering the sides easier. Fold the tablecloth/fabric over the sides of both boxes and hot glue in place. This may take a little extra effort to make it look nice so make sure to do a practice fold before applying the hot glue.
 Step 6: Glue the tablecloth/fabric over the top of the chair. Cut off excess tablecloth/fabric and hot glue around the edge of the back of the chair. Again, you should do a practice fold before applying the glue.
Step 7: Apply duck tape, layering as needed, to cover the bottom and back of the chair making sure to cover the edges of the tablecloth/fabric.
Step 8: I added thumb tacks to the sides of the chair for both decoration and to cover some of the seams.
Now you have a chair that is perfect for Kanani or any other doll!


No comments:
Post a Comment